| 1 | Use the drop down to select menu which you would like to add your menu item to. |

| 2 | In the new window you will select where your menu item will be placed. Click on “Root” to add your menu item to the main menu level, or click on a menu item to create a submenu fly-out. (in the example below, a submenu would be added to Events listed below First Event.) |
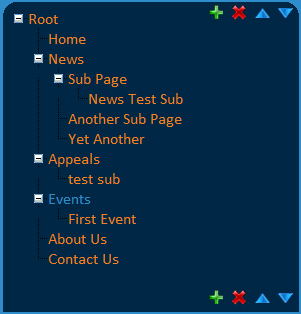
| 3 | Click on the Green “+” to add a menu ‘under’ the selected menu. |
| 4 | The “Menu Item Details” box to the right will appear with blank fields which you must fill out. Each field is explained below. |
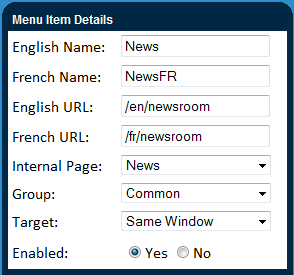
| 5 | Assign the menu an English (and French) name. This will be the label used on the menu itself. |
| 6 | Set the location where you would like the menu item to link to. You can link to an external website using the ‘Navigate URL ‘ field or you can link to a preexisting page by using the ‘Pages’ drop down. |
| • | URL indicates the external website which this menu item will link to. Make sure 'Internal Page' is set to blank. NOTE : this should be in the format : http://www.myexternalURL.com |
| • | The “Internal Page” drop down menu is used to link to an internal page which has already been created. Click the drop down to view all pages which you have access to and select the desired page to link to. |
| 7 | Select which group of users which you would like to grant access to this menu by selecting a group from the drop down. (TIP : this does not mean they can edit all sub pages) |
| 8 | Set the “Target” for where the page will load when your menu item is clicked : new window or same window. (TIP : internal links should load in same window, external links in new window) |
| 9 | When you are finished filling out all fields click “Submit”. |
|
